Wednesday, 4 June 2014

itunes error 7 windows error 126

 itunes error 7 windows error 126


Update your .netframe work to version 4 

Follow the instructions on this link, basically un-install everything, remove programs that says they are made by apple inc. (using add remove program)

Try to Clean windows registry using any Free ware PC tuner Software,

You will also need to check and verify that the following folders have been removed or not 
  • C:\Program Files\Bonjour
  • C:\Program Files\Common Files\Apple
  • C:\Program Files\iTunes
  • C:\Program Files\iPod
  • C:\Program Files\QuickTime
  • C:\Windows\System32\QuickTime
  • C:\Windows\System32\QuickTimeVR

dont forget to remove icloud alsoyou dont need to delete your itune music library though If any of these folders still exist, delete them along with their contents. (if you cant delete them, right click and go to properties and then security and change the control of the fold to you)do this for files under  program files and program file (x86) on your computer once you have deleted everything, restart your computer. Then I repaired my registry using a registry repair program. 

Important:-  instead of installing itunes I installed quick time, which installs apple application support (this is the corrupt file which is causing all the issues) i then installed itunes and it all worked fine, should take no longer than half hour to fix  hope this helps

HTTP Error 404 - File or Directory not found" error message when you request dynamic content with IIS 6.0

When you request dynamic content such as an Active Server Pages (ASP) page, an ASP.NET page, an Internet Services API (ISAPI) application, or a Common Gateway Interface (CGI) application on a Microsoft Windows Server 2003 server that is running Internet Information Services (IIS) 6.0, you may receive one of the following error messages:

     Error message 1
HTTP Error 404 - File Not Found
Error Message 2
HTTP Error 404- File or Directory not found
Cause 
     By default, when IIS is installed on any version of the Windows Server 2003 family, IIS only serves static              content (HTML).

Resolution
   Warning Enable dynamic content when you really want to use it. By default, IIS disables dynamic content for security reasons. 

To permit IIS to serve dynamic content, the administrator must unlock this content in the Web service extensions node in IIS Manager. To do this, the administrator must either enable a pre-existing Web service extension or add a new Web service extension. 

Enable a Pre-existing Web Service Extension in IIS 6.0 

To permit IIS to serve content that requires a specific ISAPI or CGI extension that is already listed in the Web service extensions list, follow these steps:
  1. Open IIS Manager, expand the master server node (that is, the Servername node), and then select the Web service extensions node.
  2. In the right pane of IIS Manager, right-click the extension that you want to enable. In this example, this is Active Server Pages.
  3. Click to select the Allow check box.
Add a New Web Service Extension to IIS 6.0

To permit IIS to serve content that requires a specific ISAPI or CGI extension that is not already listed in the Web service extensions list, follow these steps:
  1. Open IIS Manager, expand the master server node, and then select the Web service extensions node.
  2. In the right pane of the IIS Manager, click Add a new Web service extension under Tasks.
  3. In the Extension name box, type a friendly name for the extension that you want to add (for example, FrontPage Server Extensions).
  4. In the Required files box, click Add, and then select the path and the name of the file that will handle requests for the specific extension. After you select the path and the file name, click OK.
  5. If the extension must be enabled immediately, click to select the Set extension status to allowed check box.
  6. Click OK to save your changes.
Additional steps for Common Gateway Interface (CGI) applications

For CGI applications, you must also follow these steps:
  1. Right-click Default Web Site or the Web site that you want, and then click Properties.
  2. On the Home Directory tab, click Scripts and Executables in the Execute Permissions list.
  3. Make sure that the Everyone group has the following NTFS file system permissions on the C:\InetPub\wwwroot folder or on the folder that has the Web content for the site that you want:
    • Read & Execute
    • List Folder Contents
    • Read
  4. Right-click Default Web Site or the Web site that you want, and then click Properties.
  5. On the Home Directory tab, make sure that DefaultAppPool is selecting in the Application pool box. If another application pool is selected, follow these steps in IIS Manager:
    1. Expand Application Pools, right-click the application pool that you want, and then click Properties.
    2. On the Identity tab, make sure that one of the following conditions is true:
      • The Network Service account is selected.
      • The account that is selected is a member of the IIS_WPG group.

*-*-*-*-*-*-*-*-*-------*-*--------*-*-*-*-*-*-*-*-*-*-*-*-*-*-*-*-*-*-*-*-*-*-*-*-*-*-*-*-*-*-*-*-*-*-*-*-*-*-*-*-*-*-*-*-*-*-*-*

APPLIES TO
  • Microsoft Internet Information Services 6.0
  • Microsoft Windows Server 2003, Datacenter Edition (32-bit x86)
  • Microsoft Windows Server 2003, Enterprise Edition (32-bit x86)
  • Microsoft Windows Server 2003, Standard Edition (32-bit x86)
  • Microsoft Windows Server 2003, Web Edition
  • Microsoft Windows Small Business Server 2003 Premium Edition
  • Microsoft Windows Small Business Server 2003 Standard Edition


The remote session was disconnected because there are no remote desktop client access available for this computer contact the server administrator

Remote Session was disconnected because there are no Remote Desktop Client Access Available for this Computer (Microsoft Windows Error ) Solved,

For Solution Follow these easy Steps Given Below : 


Click on Start Button select ' Run ' or (  windows key + R )  for run command 
Type " Regedit " &  ok ( For Windows 7 ) Right Click on Regedit & Select " Run as administrator,

in Registry Editor select " HKEY_LOCAL_MACHINE' > select 'SOFTWARE " > Select " Microsoft " > Select " MSLicensing " 


Right Click on " MSLicensing " Select " Export " for Registry back up 

After Completeing the export process,

Back to Registry editor right click on the " MSLicensing " select " Delete " 


Click on the " Yes " to confirm the Registry Deletion,


After Completing the Process once Restart Your computer & Re login the Remote Desktop,


Citrix Error The remote session was disconnected because there are no Terminal server Lic servers available to provide a License contact the server administrator

For Solution Follow these easy Steps Given Below : 


Click on Start Button select ' Run ' or (  windows key + R )  for run command 
Type " Regedit " &  ok ( For Windows 7 ) Right Click on Regedit & Select " Run as administrator,

in Registry Editor select " HKEY_LOCAL_MACHINE' > select 'SOFTWARE " > Select " Microsoft " > Select " MSLicensing " 


Right Click on " MSLicensing " Select " Export " for Registry back up 

After Completeing the export process,

Back to Registry editor right click on the " MSLicensing " select " Delete " 


Click on the " Yes " to confirm the Registry Deletion,


After Completing the Process once Restart Your computer & Re login the Remote Desktop,


Tuesday, 6 May 2014

Transferring Contacts from Nokia to Iphone 5S

Transferring  Contacts from Nokia to Apple Iphone 5S easily

Let us Start the Process :

Tools Required to complete the process is 
  1. Nokia PC Suite
  2. Apple Itunes
  3. USB cable for Mobiles to connect the Computer,
  4. Microsoft Office ( Outlook ) Any Version with Configured Client
Follow the steps ---------- 

  • Download Nokia PC Suite From Nokia.com  ,Download  & Install in your PC
  • Download Itunes from Apple Store Download & Install in Your PC
  • After Completing the installation process Restart your Computer
  • Connect your Nokia Mobile to Your PC & Launch the Nokia PC Suite

  • Click on the " Sync Settings " & ' Select 'Phone Sync ',
  • Check the both ' Contacts ', and ' Sync Automatically Every time you connect the Phone ",
  • Click on ' More Options ',
  • in " Select with Contacts Application ', Choose ' Microsoft Outlook ",                                     How to Configuring the Outlook  
  • Click OK to Apply Settings
  • Now click ' Sync now ', under Sync 
  • After Completing contacts sync to outlook 
  • Open ' ITunes ', and connect your Iphone to computer
  • After Connecting ITunes Check for Device updates
  • Under the " info " Tab Select Sync From " Outlook ', 
  • Click ' OK '
  • Click ' Sync " 
  • Note :  it may take few minutes to complete it depends upon the saved numbers quantity i have synced the 812 contacts on 3 Minutes,
After completing the process once switch off & turn on your Mobile to Effect the changes, 


Thank You ...............! Please give your Valuable suggestions 

Monday, 5 May 2014

How to Set Up Outlook to Send and Receive Email

How to Set Up Outlook to Send and Receive Email ?


  1. Open Outlook. Select Account Settings... from the Tools menu.*
  2. On the E-mail tab, click New.*
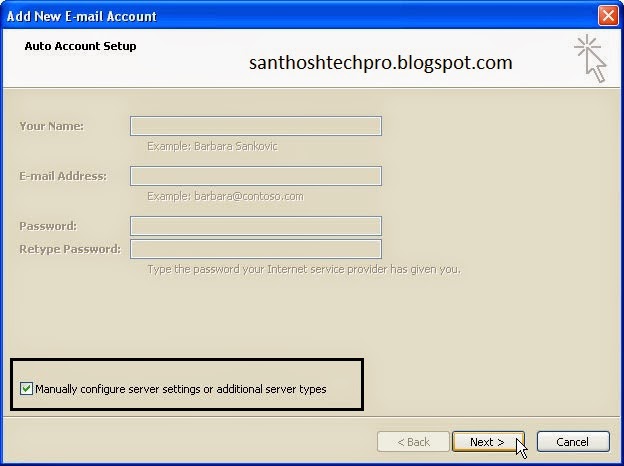
  3. Select "Manually configure server settings or additional server types" and click Next *
  4. Select Internet E-mail and click Next *
  5.      Enter the following information for E-mail Accounts.   *                                                    
    o    Your Name: Enter the name you wish recipients to see when they receive your message.
    o    Email Address: This is the address that your contacts' email program will reply to your messages. This is also the address that will get recorded in your contacts' address book if they add you as a contact.
    o    Account Type: POP3
    o    Incoming mail server: Enter pop3.mail server name.com Eg: For gmail “ pop3.gmail.com”,
    o    Outgoing mail server (SMTP): Enter smtp.mailservername.com  Eg : For Gmail “ smtp.gmail.com’,
    o    User Name: Enter your full e-mail address eg:123@gmail.com
    o    Password: If you wish for Outlook to save your password, check the box labeled Remember Password and enters your password in the text field.
    o    Click More Settings...
  6. Click on the Outgoing Server tab, and check the box labeled My outgoing server (SMTP) requires authentication. Then choose to Use same settings as my incoming mail server

  7. Click on the Advanced tab.
    • Under Incoming Server (POP3), the port number should be set to 995.( Depend on service provider ports )
    • Under Outgoing Server (SMTP), the port number should be set to 465.( Depend on service provider ports )                                                                                                                             The above mentioned ports are applicable for all email client includes Gmail & Yahoo Etc
  8. if you want to leave a copy on the server other wise remove check mark from " Leave a copy of messages on the server '
  9. click ' OK ',
  10. Click ' Next and click ' Finish.

Thanks You ............................! For More Tech updates keep visiting 

www.santhoshtechpro.blogspot.com

Friday, 2 May 2014

What is I P ?
An Internet Protocol address (IP address) is a numerical label assigned to each device (e.g., computer, printer) participating in a computer network that uses the Internet Protocol for communication. An IP address serves two principal functions: host or network interface identification and location addressing. Its role has been characterized as follows: "A name indicates what we seek. An address indicates where it is. A route indicates how to get there."
The designers of the Internet Protocol defined an IP address as a 32-bit number consisting of 4 octets and this system, known as Internet Protocol Version 4 (IPv4), is still in use today. However, due to the enormous growth of the Internet and the predicted depletion of available addresses, a new version of IP (IPv6), using 128 bits for the address, was developed in 1995. IPv6 was standardized as RFC 2460 in 1998, and its deployment has been ongoing since the mid-2000s.
IP addresses are binary numbers, but they are usually stored in text files and displayed in human-readable notations, such as 172.16.254.1 (for IPv4), and 2001:db8:0:1234:0:567:8:1 (for IPv6).
The Internet Assigned Numbers Authority (IANA) manages the IP address space allocations globally and delegates five regional Internet registries (RIRs) to allocate IP address blocks to local Internet registries (Internet service providers) and other entities.
An Internet Protocol Address is also we can use as a  Network address of computer, printer and other network devices, internet protocol help us to find  all devices over the network using a small command,

Eg : nslookup “  your computer ip address “ Enter ( which shows the complete details like device name & workgroup ).

How to Check my I P Address
Follow the steps given below:
·         Press ‘  windows Key + R ‘ for Run Command


·         Type “ cmd “ press ok
·         Command prompt window appears on screen type “ ipconfig/all “ and Enter

       the Command Collect All I P details of Network adapters

 Thank You .............!